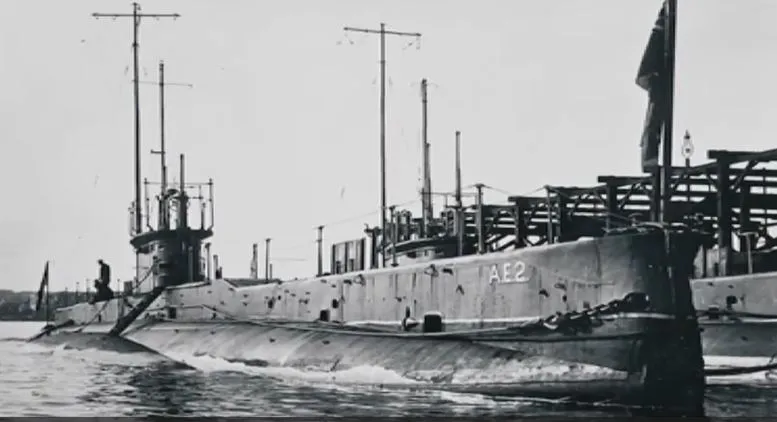
Commissioned in 1914, the E-class submarine HMAS AE2 carved out an extraordinary legacy in the early days of the Royal Australian Navy (RAN). Alongside her sister ship, AE1, she completed the longest submarine voyage recorded at the time just to reach Australian waters—a major milestone for the young navy.
When World War I broke out, AE2 initially deployed to German New Guinea with the Australian Naval and Military Expeditionary Force before patrolling the waters around Fiji. Her true claim to fame, however, arrived after her transfer to the Mediterranean. There, she made history during the Dardanelles Campaign as the first submarine to successfully breach the treacherous straits and enter the Sea of Marmara. Though mechanical failures ultimately forced her crew to scuttle the vessel—leading to their capture—AE2 stands as a powerful testament to early naval courage, and holds the solemn distinction of being the only RAN vessel that enemy action claimed during the war.
After the ship spent decades on the ocean floor, the Rahmi M. Koç Museum discovered her wreck in 1998. Today, a joint conservation effort by the Australian and Turkish governments ensures that this historic vessel rests securely in its final burial site.
Commissioned at Portsmouth on 28 February 1914, the E-class submarine HMAS AE2 carved out an extraordinary legacy in the formative years of the Royal Australian Navy (RAN). Built by Vickers Limited at Barrow-in-Furness, England, AE2 represented the absolute vanguard of naval technology for the young Australian nation. Alongside her sister vessel, HMAS AE1, she was crewed by a joint complement of British Royal Navy and newly trained Royal Australian Navy officers and sailors, commanded by Lieutenant Commander Henry Hugh Gordon Dacre Stoker RN. Shortly after commissioning, both submarines embarked on what was then the longest recorded delivery voyage undertaken by any submarine in history—sailing over 13,000 nautical miles from Portsmouth to Sydney. This monumental transit announced Australia’s emergence as an independent maritime force capable of operating modern diesel-electric naval power.
Detailed operational histories of the submarine’s construction, specification, and service record are preserved by the Sea Power Centre – Royal Australian Navy.
When World War I broke out in August 1914, AE2 was immediately dispatched to join the Australian Naval and Military Expeditionary Force (ANMEF) tasked with seizing German New Guinea. Following the swift capture of German naval wireless stations and territory, AE2 carried out patrol duties around Fiji and the southwest Pacific before returning to Sydney in late 1914 for maintenance.
Recognizing the urgent need for naval support in the European theatre, Australian defense authorities assigned AE2 to escort the second convoy of the Australian Imperial Force (AIF). Leaving Albany, Western Australia, on 31 December 1914, the submarine was towed across the Indian Ocean by the auxiliary transport ship SS Berrima to conserve engine wear and fuel. Arriving at Port Said in January 1915, AE2 was integrated into the British Royal Navy’s 2nd Submarine Squadron based at the Aegean island of Tenedos, placing her directly at the heart of Allied planning for the Eastern Mediterranean.
Archival photographs and official service records from these early Pacific and convoy missions are digitized in the Australian War Memorial HMAS AE2 Collection.
By early 1915, the Allied strategy demanded a passage through the heavily fortified Dardanelles Strait—a 35-mile-long waterway leading directly into the Sea of Marmara. The objective was vital: if Allied submarines could breach the strait, they could sever the waterborne supply lines carrying Ottoman troops, heavy munitions, and provisions from Constantinople (Istanbul) to the defense forces on the Gallipoli Peninsula.
The obstacles, however, appeared virtually insurmountable:
Mines and Defenses: A complex network of ten dense minefields lined the narrow channel.
Artillery Surveillance: Dozens of fixed coastal artillery forts and mobile shore batteries swept every yard of the water.
Natural Hazards: Treacherous 5-knot surface counter-currents at the Narrows threatened to drain submarine batteries during underwater transit.
Surface Patrols: Continuous searchlights and vigilant Ottoman gunboats patrolled the narrows day and night.
Several British and French submarines had already attempted the passage; all were sunk or forced to turn back. After a preliminary attempt on 24 April was aborted due to damaged forward hydroplanes, Commander Stoker requested permission to make a bold, full-scale attempt early the following morning.
Educational materials outlining the broader naval strategy are detailed on the Department of Veterans’ Affairs Anzac Portal.
At 02:30 on 25 April 1915—just hours before ANZAC soldiers began their fateful amphibious landings at Anzac Cove—AE2 slipped into the dark waters of the Dardanelles. Running on her surface diesel engines until searchlights picked her up, Stoker dived the boat into the minefields, navigating blind beneath the waves while mine mooring cables scraped along the hull.
When AE2 surfaced near Çanakkale to check her position, she encountered the Ottoman gunboat Peyk-i Şevket. Stoker immediately fired a torpedo, heavily damaging the vessel, before diving to evade an approaching enemy destroyer. During the ensuing evasive maneuvers, AE2 ran aground twice directly beneath the guns of Ottoman shore forts. Remarkably, because the submarine was stranded so close to the base of the cliffs, the enemy artillery pieces could not depress their barrels far enough down to strike the hull.
Working the engines frantically, Stoker managed to slide AE2 back into deep water, negotiated the hazardous turn at the Narrows, and broke through into the open Sea of Marmara on the evening of 26 April. She had become the first Allied submarine in history to successfully complete the perilous passage.
Upon reaching the Sea of Marmara, Stoker surfaced and transmitted a wireless message confirming her breakthrough. That night, Allied commanders—including Vice-Admiral John de Robeck and General Sir Ian Hamilton—were debating whether to evacuate the pinned-down troops at Anzac Cove. News of AE2’s audacious success provided a vital psychological boost, convincing commanders that the Turkish rear could be disrupted and prompting Hamilton to issue his famous order: “You have got through the difficult business, now you have only to dig, dig, dig, until you are safe.”
For four intense days, AE2 patrolled the Sea of Marmara, creating panic among Ottoman military transport ships. Although mechanical defects with her torpedoes prevented additional sinkings, her presence demonstrated that the Ottoman military’s maritime lifeline was compromised. On 29 April, AE2 met with the British submarine HMS E14, which had followed her route through the opened strait.
On the morning of 30 April 1915, while approaching a rendezvous with E14, AE2 encountered the Ottoman torpedo boat Sultanhisar. As Stoker dived to attack, a sudden ballast control breakdown caused the submarine’s stern to plunge while her bow broke the surface. Sultanhisar immediately opened fire, puncturing AE2’s pressure hull and engine room.
Realizing the boat was hopelessly damaged, Commander Stoker ordered the ballast tanks flooded to ensure the vessel would sank into deep water rather than fall into enemy hands. All 35 crew members evacuated safely before AE2 plunged to the seabed. They were rescued by the crew of Sultanhisar and spent the remainder of the war as prisoners of war (POWs). Four crew members tragically succumbed to illness during captivity, but AE2 earned the solemn historic distinction of being the only Royal Australian Navy vessel lost to enemy action in World War I.
For 83 years, AE2 lay undisturbed under 73 metres of water in Erdek Bay. In June 1998, an expedition led by Turkish maritime historian Selçuk Kolay discovered the intact wreck.
Subsequent joint scientific surveys funded by Australian and Turkish heritage bodies confirmed that the hull remains in a remarkable state of preservation. Rather than attempting a risky salvage that could destroy the fragile hull, both governments agreed to leave AE2 in situ as an underwater grave and memorial. Today, the site is protected by international maritime agreements, with artifacts and documentation showcased at the Rahmi M. Koç Museum in Istanbul.
Known to military historians as the “Silent Anzac,” HMAS AE2 remains an enduring emblem of courage, technical ingenuity, and shared heritage between Australia and Türkiye.